Why Presprout Peas? Unlock a Faster, Healthier Pea Harvest
Few things are as rewarding in the garden as harvesting your own fresh peas, bursting with sweet flavor. Yet, for many home gardeners, growing peas can present a familiar set of frustrations: uneven germination, seeds rotting in the soil, or simply waiting too long for those first precious sprouts to emerge. What if there was a simple, effective technique that could virtually eliminate these headaches, giving you a significant head start on the growing season? Enter **presprouting peas**.
Presprouting is a game-changer for pea cultivation, transforming uncertain direct sowing into a reliable, predictable process. By giving your pea seeds a controlled environment to begin germinating *before* they even touch garden soil, you sidestep common pitfalls like cold, damp conditions that lead to rot, and identify non-viable seeds before they waste your precious time and garden space. This method guarantees stronger starts, faster growth, and ultimately, a more bountiful pea harvest.
The Core Benefits of Presprouting Peas: Why Bother?
While it might seem like an extra step, the advantages of presprouting peas far outweigh the minimal effort involved. This technique addresses several critical challenges that pea growers often face, paving the way for a more successful and less stressful gardening experience.
Eliminating the Risk of Seed Rot in Cold, Wet Soil
One of the most significant reasons to presprout peas, particularly in cooler climates or early spring, is to combat seed rot. Pea seeds are notoriously susceptible to rotting when planted directly into cold, overly damp soil. These conditions, often present when gardeners are eager to get their peas in the ground, can cause seeds to absorb too much moisture and decay before they ever get a chance to sprout. The result? Gaps in your rows, wasted seeds, and the frustrating need to replant.
Presprouting bypasses this problem entirely. By germinating seeds in a warm, controlled indoor environment, you ensure they develop their initial root (radicle) and shoot before being exposed to unpredictable outdoor conditions. Once these young sprouts are ready, they are far more resilient and better equipped to handle cooler soil temperatures, dramatically reducing the risk of rot and ensuring a higher percentage of successful seedlings.
Turbocharging Germination Speed and Garden Efficiency
Time is a precious commodity in the garden. Every day counts, especially when you're aiming for an early harvest or trying to fit multiple successions into your growing season. Presprouting peas can shave crucial days off their germination time – often speeding up the process by as much as 5 days. This head start allows your pea plants to establish themselves faster, leading to earlier harvests and a longer picking season.
Furthermore, knowing which seeds are viable and ready to grow before planting means you won't be waiting indefinitely for stubborn seeds that may never sprout. This efficiency allows you to plant exactly what you need, exactly where you want it, optimizing your garden layout and ensuring every square inch is productive. It gives you invaluable control over your planting schedule, allowing you to perfectly time your peas with favorable weather conditions and other garden plantings.
Guaranteed Viability: Planting with Confidence
Have you ever planted an entire packet of seeds, only to find sparse, patchy growth? This often indicates low seed viability. Presprouting acts as an excellent "germination test" for your pea seeds, especially if you're using older seeds or an unknown batch. By observing which seeds sprout and which don't during the presprouting process, you gain invaluable insight into your seed lot's viability.
This means you'll only plant seeds that are actively growing, eliminating the frustration of wasted effort and empty spots in your garden. For old or questionable seed packets, you can conduct a small test batch (say, 10 seeds) to estimate the germination rate before committing to a larger planting. This practice saves money, time, and reduces the need for disappointing replanting sessions. You plant with the confidence that every seed you place in the soil has a strong chance of thriving.
Presprouting vs. Soaking/Nicking: A Clarification
Many gardeners are familiar with methods like soaking or nicking seeds to improve germination, particularly for hard-shelled varieties. For peas, especially sweet peas, there's been a long-running debate about the efficacy of these techniques. Some traditional advice suggests soaking sweet pea seeds overnight, while others propose scarifying (nicking) the seed coat.
However, side-by-side tests have shown that for peas, simple soaking or nicking often does little to improve germination rates or speed compared to direct sowing. This is where presprouting truly stands out as a superior method. While an initial dip in water to *moisten* the seeds before wrapping them in a paper towel can be beneficial, prolonged soaking doesn't offer the same controlled, consistent environment that presprouting provides.
The damp paper towel method creates a consistently moist, warm, and dark mini-environment that is ideal for pea germination. Unlike just soaking, which merely hydrates the seed, presprouting allows you to *see* the germination process unfold and plant only those seeds that have successfully initiated growth. This visual confirmation and controlled development make presprouting a far more reliable and effective strategy than just a pre-plant soak or nick.
Your Step-by-Step Guide to Presprouting Peas Successfully
The beauty of presprouting peas lies in its simplicity. With just a few common household items, you can set your pea plants up for guaranteed success.
Gathering Your Simple Supplies
To begin your presprouting journey, you'll need:
- Your chosen **pea seeds** (shelling peas, snap peas, snow peas, or sweet peas).
- **Paper towels** or unprinted newspaper.
- A **plastic bag** (ziplock bags work perfectly).
- A spray bottle with **water**.
- A **permanent marker** for labeling.
The Presprouting Process
- Moisten Your Seeds: While not a prolonged soak, give your pea seeds a quick rinse or dip in water to thoroughly moisten their outer shells. This kickstarts the hydration process.
- Prepare the Paper Towel: Take a sheet of paper towel and dampen it thoroughly with water. It should be moist but not dripping wet.
- Arrange the Seeds: Spread your moistened pea seeds evenly across one half of the damp paper towel, ensuring they are not touching each other. For larger batches, you may need multiple paper towels.
- Fold and Enclose: Fold the other half of the paper towel over the seeds, then fold the sides inward, creating a neat "envelope" package that keeps the seeds securely nestled.
- Bag and Label: Carefully place the paper towel envelope into a plastic ziplock bag. This bag will maintain humidity and warmth. Use your permanent marker to label the bag with the pea variety and the date you started the presprouting process.
- Create a Warm, Dark Environment: Seal the bag, leaving a tiny corner slightly vented to allow for a little air exchange. Place the bag in a warm, dark spot. Ideal temperatures for pea germination are typically between 65-75°F (18-24°C). A kitchen counter near a warm appliance or on top of a refrigerator can work well.
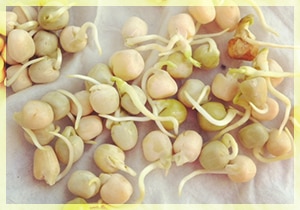
- Monitor Daily: Check your seeds daily. Within 3-7 days, you should start to see tiny white roots (radicles) emerging from the seeds. Once a majority of your seeds have developed a visible root, they are ready for planting.
Tip: If the paper towel starts to dry out, gently mist it with water to re-moisten.
Planting Your Sprouted Peas
Once your pea seeds have sprouted, it's crucial to plant them promptly and carefully:
- Gentle Handling: Sprouted seeds are delicate. Handle them with extreme care to avoid damaging the tender roots.
- Prepare Your Soil: Ensure your garden bed or containers are prepared with well-draining, damp soil.
- Planting Depth: Plant each sprouted pea about 1 inch deep and 2-3 inches apart, or according to specific variety instructions. Create a small hole, gently place the sprouted seed with the root pointing downwards, and lightly cover with soil.
- Watering and Light: After planting, lightly water the area. Place containers in a location with bright light. For garden beds, ensure they receive adequate sunlight. The young plants will now be focused on developing shoots and leaves.
Beyond the Basics: Advanced Tips for Pea Growers
To further elevate your pea-growing game, consider these additional insights:
- Variety Matters: While the presprouting method works wonders for most pea varieties, be mindful of specific instructions for unique types. For detailed guidance on specific varieties, you might find valuable insights in articles such as Presprouting Sweet Peas: Your Guide to Early, Healthy Growth.
- Temperature Consistency: Maintaining a consistent warm temperature during presprouting is key. Avoid fluctuating temperatures, which can delay or hinder germination.
- Labeling is Key: If presprouting multiple varieties, meticulous labeling will save you headaches later. Write down the variety name and start date on each bag.
- Don't Let Them Get Too Long: Plant your sprouted peas as soon as the radicle is visible and a reasonable length (around 1/4 to 1/2 inch). If the root gets too long or intertwined, it becomes much harder to plant without damage.
- Consider Seed Treatments: For added protection against fungal diseases in the soil, some gardeners opt for organic seed treatments, though presprouting significantly reduces the need for such measures by getting plants off to a robust start. For a comprehensive overview of the entire process, including troubleshooting, explore resources like How to Presprout Peas: Guarantee Germination Success.
Conclusion
Presprouting peas is more than just a gardening hack; it's a strategic move that guarantees a higher success rate, a faster start, and a more fulfilling pea harvest. By taking a few simple steps indoors, you mitigate the risks of cold soil rot, identify viable seeds with certainty, and give your pea plants the earliest possible advantage. Embrace this powerful technique, and you'll soon be enjoying an abundance of fresh, homegrown peas, transforming your garden into a model of efficiency and productivity. Say goodbye to planting uncertainty and hello to a season of vibrant, thriving pea plants!