How to Presprout Peas: Guarantee Germination Success
Gardeners often face the heartbreaking disappointment of seeds that fail to sprout, leading to empty patches, wasted effort, and a frustrating delay in the growing season. This is particularly true for peas, which, despite their hardiness, can struggle in cold, damp soil, often rotting before they even have a chance to emerge. But what if there was a simple, foolproof method to ensure every pea seed you plant thrives? Enter the world of
presprouting peas – a game-changing technique that promises robust germination and a head start for your pea harvest.
Presprouting peas involves giving your seeds an ideal environment to begin germinating indoors before they ever touch the garden soil. This crucial head start bypasses many of the common pitfalls of direct sowing, transforming uncertainty into guaranteed success. Whether you're a seasoned gardener looking to optimize your yield or a beginner hoping to avoid early season frustrations, mastering the art of presprouting will revolutionize your pea-growing experience.
Why Presprout Peas? Unlocking Success in Your Garden
The benefits of presprouting peas extend far beyond simply getting a sprout to show. This method addresses several key challenges that traditional direct sowing presents, offering a suite of advantages that translate directly into a healthier, more abundant garden.
The most compelling reason to presprout is the **guarantee of germination**. When pea seeds are planted directly into cold, wet spring soil, they are highly susceptible to rotting before they can germinate. This is especially true in regions with unpredictable spring weather. By initiating germination indoors, you control the environment, providing the perfect conditions for the seed to awaken without the threat of disease or decay. This means you're not wasting precious seeds or valuable gardening time planting duds.
Beyond preventing rot, presprouting offers a significant **speed advantage**. Seeds that have been presprouted typically germinate and are ready for planting several days faster than their direct-sown counterparts – often by as much as five days. This accelerated start allows your pea plants to establish themselves earlier in the season, leading to an earlier harvest. For those with shorter growing seasons, this can be the difference between a successful crop and a disappointing one.
Another invaluable benefit, particularly for gardeners using older seed packets, is **viability testing**. If you're unsure whether your pea seeds are still good, presprouting a small batch (say, 10 seeds) allows you to quickly determine their germination rate. If only a few sprout, you know to use more seeds when planting or to purchase a fresh packet. This prevents the frustration of planting an entire row only to discover weeks later that the seeds were non-viable. To delve deeper into these advantages, explore
Why Presprout Peas? Avoid Rot, Boost Speed & Viability.
Finally, presprouting provides **better control over your planting schedule**. You can time the sprouting process to coincide precisely with favorable weather conditions and prepared soil, ensuring your young seedlings hit the ground running when conditions are optimal. This meticulous timing maximizes the chances of your pea plants thriving and producing an abundant harvest, free from the guesswork of direct sowing.
It's also worth noting the specific case of sweet peas. While there's a long-running debate about the effectiveness of soaking or nicking sweet pea seeds, side-by-side tests have shown that these methods often do little to aid germination. What *does* help immensely, however, is presprouting. This technique bypasses the tough seed coat by allowing the seed to sprout on its own terms in a controlled environment, proving superior to pre-treatment methods for these beloved blooms.
Gathering Your Simple Presprouting Supplies
One of the beauties of presprouting is how few specialized tools you need. Most of what you require can likely be found in your kitchen or gardening shed.
Here’s your essential checklist:
- Pea Seeds: Whether you're growing garden peas, snap peas, snow peas, or beautiful sweet peas, the method is largely the same.
- Water: Room temperature tap water is perfectly fine.
- Paper Towels: Standard kitchen paper towels work best. They retain moisture well and are easy to handle.
- Plastic Bag: A Ziploc-style bag is ideal as it can be sealed, yet easily vented. Clear bags allow for easy monitoring.
- Optional: Marker: For labeling your bags with the pea variety and date.
- Optional: Small Container: For an initial overnight soak, if you choose that method.
Having these items ready will make the presprouting process smooth and enjoyable.
The Step-by-Step Guide to Presprouting Peas
Presprouting peas is a straightforward process that anyone can master. Follow these steps for guaranteed success:
-
Initial Hydration (Optional Overnight Soak)
While some varieties of peas might benefit from just a quick dip, many gardeners find an overnight soak beneficial. Gently place your pea seeds in a bowl of room-temperature water. Allow them to soak for 8-12 hours. This step helps to soften the tough outer seed coat and jumpstarts the water absorption process, signaling to the embryo that it's time to wake up. For sweet peas, specifically, while a simple soak alone might not be the magic bullet, incorporating this initial hydration into the full presprouting method can still be beneficial.
-
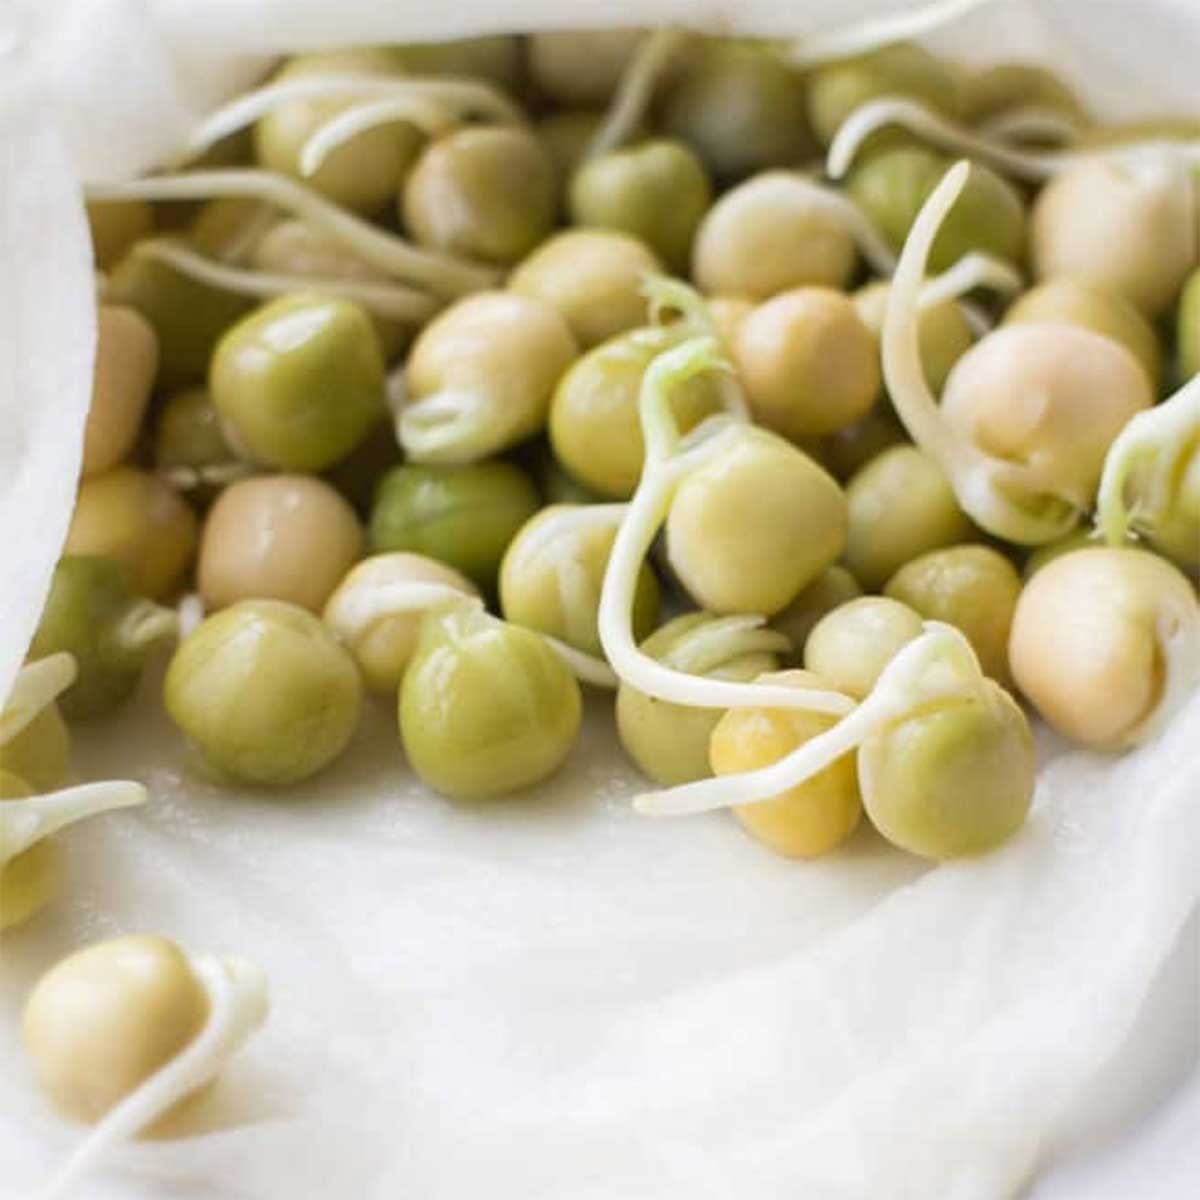
Prepare Your Paper Towel Incubator
Take a paper towel and dampen it thoroughly. It should be moist but not dripping wet. You want it to feel like a wrung-out sponge. Lay the damp paper towel flat. Place your soaked (or just wet) pea seeds on one half of the paper towel. Ensure they are spaced out, not touching, to allow for good air circulation and prevent mold. Fold the other half of the paper towel over the seeds, then fold it again into a compact packet, much like an envelope. This ensures the seeds remain in contact with the moisture. Avoid overcrowding the seeds; if you have many, use multiple paper towels.
-
Create the Ideal Environment
Carefully slide your paper towel packet, containing the pea seeds, into a plastic bag (a Ziploc bag is perfect). It’s crucial to vent the bag slightly – leave one corner slightly open, or poke a tiny hole – to allow for air exchange and prevent excessive humidity that can lead to mold. Label your bag with the pea variety and the date you started the presprouting process. Place the sealed, vented bag in a warm location. An ideal temperature is typically between 65-75°F (18-24°C). Peas generally don't require light to germinate, so a dark cupboard or on top of a refrigerator can be a good spot.
-
Daily Monitoring and Patience
Check your seeds daily. After a few days (typically 3-7 days, depending on the pea variety and temperature), you will start to see tiny white roots, called radicles, emerging from the seeds. This is your sign of successful germination! Ensure the paper towel remains consistently damp during this period. If it feels like it's drying out, mist it lightly with a spray bottle, being careful not to overwater.
-
Planting Your Sprouted Peas
The moment your pea seeds sprout, it's time to plant them. Don't wait too long, as the roots can grow quickly and become tangled or damaged. Handle the sprouted seeds very gently to avoid breaking the delicate radicle. Plant each sprouted pea into damp, prepared garden soil at the appropriate depth for the variety (usually about 1 inch deep). Ensure the root is pointing downwards. After planting, provide them with plenty of bright light to encourage healthy top growth. If you are specifically interested in growing sweet peas, our guide on Presprouting Sweet Peas: Your Guide to Early, Healthy Growth offers tailored advice for these beautiful climbers.
Troubleshooting Common Presprouting Issues
While presprouting is generally foolproof, occasional issues can arise:
- No Sprouts: If after a week or more, nothing has happened, your seeds might be too old and non-viable, or the environment might be too cold or too dry. Ensure consistent warmth and moisture.
- Mold: If you see fuzzy mold, the paper towel was likely too wet, or the bag wasn't vented enough. Reduce moisture and increase ventilation. You might need to discard the moldy seeds and start a new batch.
- Leggy Sprouts: If your sprouts look long and spindly with long roots and pale shoots, you've waited too long to plant them after germination. Plant immediately and ensure they get adequate light after transplanting.
Beyond Presprouting: Ensuring Pea Success in Your Garden
Presprouting is an excellent first step, but the journey to a bountiful pea harvest doesn't end there. Once your presprouted peas are in the ground, continued care is essential.
Ensure your planting site has well-drained, rich soil amended with compost. Peas thrive in full sun, meaning at least 6-8 hours of direct sunlight per day. Consistent watering is crucial, especially during flowering and pod development, but avoid overwatering, which can lead to root rot.
Most pea varieties, especially shelling and snap peas, are climbing plants and will benefit immensely from a support structure like a trellis, netting, or stakes. This keeps the vines off the ground, improves air circulation, reduces disease risk, and makes harvesting much easier. Keep an eye out for common pests like aphids and slugs, and address them promptly using organic methods if possible. With presprouting and attentive care, your pea patch will be overflowing with delicious pods in no time!
Conclusion
Presprouting peas is a simple yet incredibly effective technique that transforms the often-uncertain process of seed germination into a reliable success story. By providing your pea seeds with the optimal conditions to sprout indoors, you mitigate the risks of cold soil and rot, accelerate growth, and gain invaluable insight into seed viability. This method not only saves time and resources but also lays the foundation for a healthier, more productive pea harvest. Embrace the power of presprouting, and prepare to enjoy the sweet reward of homegrown peas, knowing each vibrant green shoot began its life with the best possible start.